
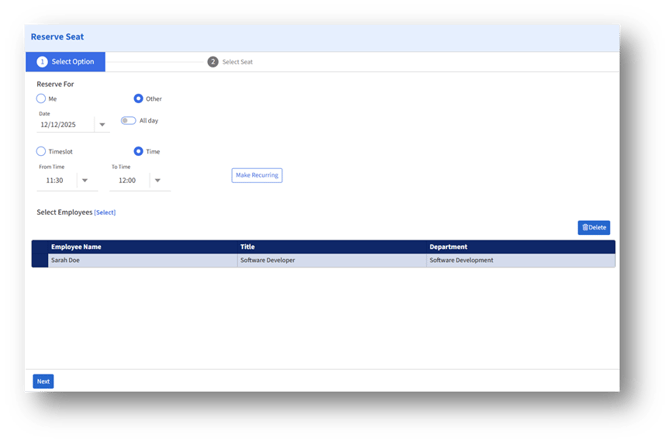
The Reserve for Others feature allows admins to reserve seats for other employees or entire teams.
- Select Option
1.1 Open the Reserve Seat Page
Navigate to Reserve Seat → Select Option
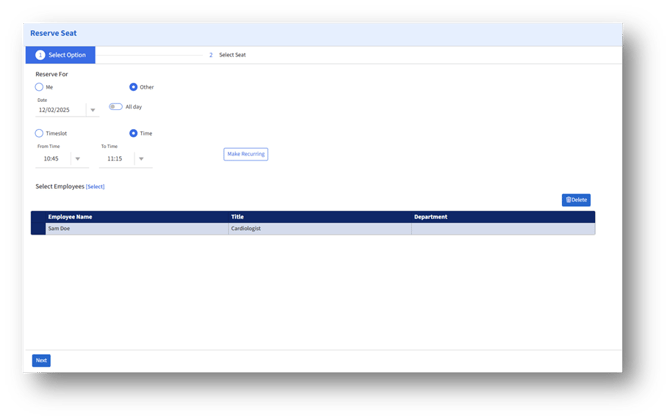
1.2 Reserve For – Other
Select Other to make a reservation for employees.
1.3 Choose Date and Time
Set the reservation details:
Date
Select the date for which the seat is required.
All Day (Optional)
Enable this option if a full-day reservation is needed.
Time or Timeslot
1. Select Timeslot if predefined slots exist, or
2. Select Time and manually enter From Time and To Time
1.4 Make Recurring (Optional)
Click Make Recurring to create repeated reservations.
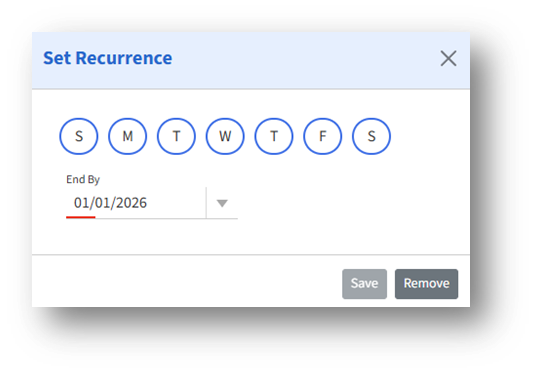
Set Recurrence Window
1. Select one or more days of the week (S, M, T, W, T, F, S)
2. Set the End By date
3. Click Save to apply or Remove to clear recurrence
1.5 Select Employees
Click Select next to Select Employees to choose whom you are reserving seats for.
Two selection modes are available:
2. Select Employees
2.1 Select by Team
The Team option allows you to select all members of an assigned team.
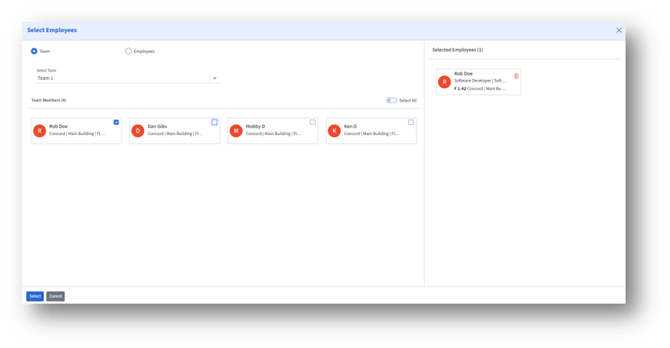
Steps:
- Choose Team.
- Select the team from the Select Team dropdown.
- View all team members displayed as tiles.
- Select individuals or enable Select All.
- Click Select to confirm.
2.2 Select by Employees
The Employees option provides a broader employee list with search and filter options.
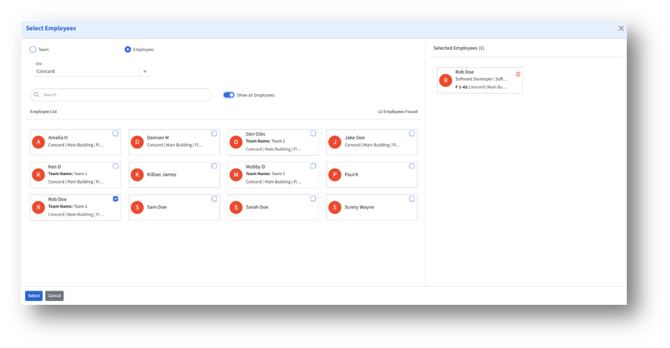
Steps:
- Choose Employees.
- Filter by Site.
- Use Search to find an employee.
- Enable Show All Employees if required.
- Select one or more employees.
- Selected employees appear in the Selected Employees panel on the right.
- Click Select to finalize employee selection.
3. Review Selected Employees
After selection, employees are listed on the Select Option page.
You can:
1. Review each employee’s Name, Title, and Department
2. Remove an employee using the delete icon
3. Click Next to navigate to the Select Seat page.
4. Select Seat (For Selected Employees)
In the Select Seat page, all selected employees appear in the left panel.
You have three ways to assign seats:
4.1 Auto Reserve
Click Auto Reserve to have the system automatically assign a suitable seat for the employee.
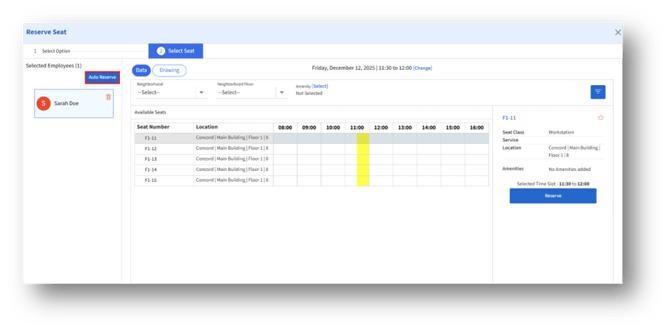
4.2 Assign Seats Manually
You can manually assign seats using:
A. Data View
B. Drawing View
The selected date and time appear at the top for reference.
5. Seat Assignment – Data View
The Data view displays a table of available seats with time-based availability.

Available Features
1. Location/Neighborhood filters
2. Amenity filter
3. Near Colleague filter
How to Assign a Seat
- A seat row will be selected by default, and you can choose any available seats and review their timeline availability.
- Select a seat row to view its details in the right panel.
- The time selected in the Select option will be reflected in the right panel.
- You can change the time by scrolling horizontally to choose a new time window.
- Confirm seat details, including:
A. Seat Class
B. Org. Unit
C. Location
D. Amenities
E. Selected Time Slot
6. Click Reserve to assign that seat to the employee.
6. Seat Assignment – Drawing View
The Drawing tab displays a floor plan view of available and occupied seats.
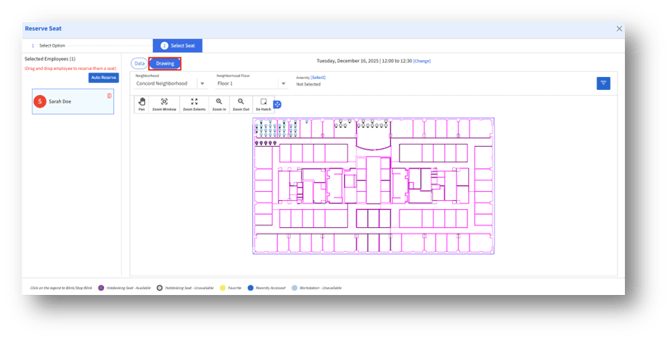
Navigation Tools
1. Pan
2. Zoom Window
3. Zoom Extents
4. Zoom In / Zoom Out
5. De-Hatch
Seat Color Legends
a. Seat color legends on the bottom indicate the availability and status of each workspace, helping admins quickly identify which seats are open, occupied, or marked with special indicators.
b. Clicking on any seat color legend at the bottom will enable blinking of the selected seat category. To stop blinking, click the chosen seat color legend again.]
How to Assign a Seat?
- Select Filters
Use the Location or Neighborhood dropdown filters to view the desired seating area. - Choose an Assignment Method
You can assign a seat using either of the following methods:
2a. Select from the Floor Plan
a. Click any available seat icon displayed on the floor plan.
b. The seat details will appear in the panel on the right.
c. Click Reserve to assign the seat to the selected employee.
2b. Drag and Drop an Employee
1. In the left panel, select an employee.
2. Drag and drop the employee onto an available seat on the floor plan.
3. Confirmation and Results
A. A confirmation message will appear once the seat is successfully assigned.
B. The assigned seat will now appear in the employee’s My Reservations list.
C. If recurrence was enabled during assignment, all applicable recurring reservations will be created automatically.